We use caching techniques to improve the performance of a web server, particularly by enhancing the Time to First Byte (TTFB), a key performance metric.
The TTFB measures the time between requesting a resource and receiving the first byte of a response. According to Google, a good website should have a TTFB below 200 ms. If TTFB exceeds 1 second, it can increase the bounce rate, as users tend to leave slow-loading websites. A higher bounce rate negatively impacts a site’s ranking.
TTFB Tests on a Local WordPress Installation
To measure the TTFB of a WordPress site, we conducted tests with and without caching enabled. These tests were performed on a locally hosted WordPress installation to closely observe the impact of caching. Below are the specifications of the test machine:
- WordPress: v6.4.1
- Operating System: Windows 11, x64-based processor
- Web Server: Apache XAMPP
- RAM: 8GB
- Processor: AMD Ryzen 5 5500U with Radeon Graphics, 2.10 GHz
We began by establishing a baseline. A simple “Hello World” program in PHP and HTML both showed a TTFB of around 20–25 ms.
The TTFB results of the WordPress site with different caching configurations are as follows:
- WordPress without Caching: 500–600 ms
- WordPress with OPcache: 140–200 ms
- WordPress with Page Cache: 45–60 ms
When we enabled the expert mode of WP Super Cache, the TTFB dropped to around 20–25 ms. These tests clearly demonstrate a significant performance improvement with the expert mode enabled.
On a live website, TTFB varies between 40 milliseconds and 2 seconds, depending on the server’s location. However, by using a content delivery network (CDN), you can maintain a consistent TTFB of 50–200 ms. For further performance optimization, adding browser caching rules to the server’s configuration can help. For more details, refer to our guide on common Apache configurations.
Now, let’s explore how to configure WP Super Cache and its ideal settings to ensure optimal performance for your WordPress website.
Configure Advanced Settings
WP Super Cache offers two configuration modes: Easy and Advanced. For optimal performance, we will configure the advanced settings.
To start, check the Enable Caching checkbox to activate caching functionality.

Bug in WP Super Cache (Expert Mode)
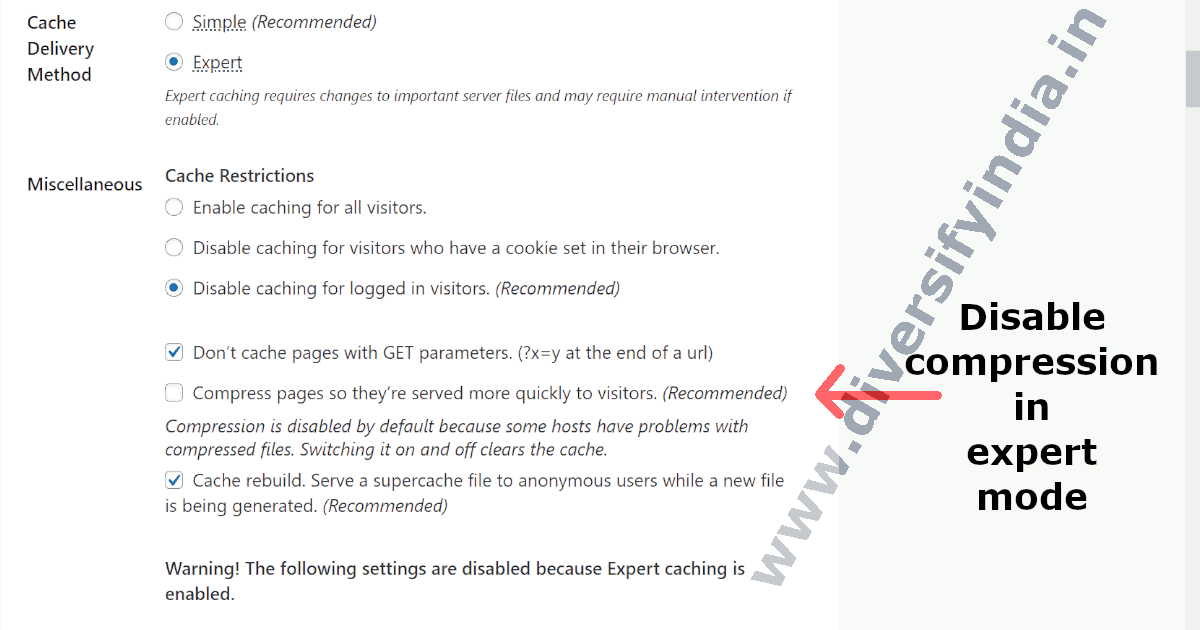
At the time of writing, a bug in expert mode deletes the .htaccess file when purging all cache or by enabling the option ‘clear all cache files when a post or page is published or updated’. This file is essential as it contains rules for serving compressed HTML files. Without it, the browser might receive a downloadable gzip file, which can break your website.
How to Fix the Bug?
- Either disable compression while using expert mode or move the
.htaccessfile fromwp-content/cacheto thewp-contentdirectory. - Alternatively, use the plugin in simple mode, though this can lead to higher server load due to PHP-level page caching.
Note: Expert mode is recommended as it offers server-level caching, which is faster and more efficient than PHP-level caching.
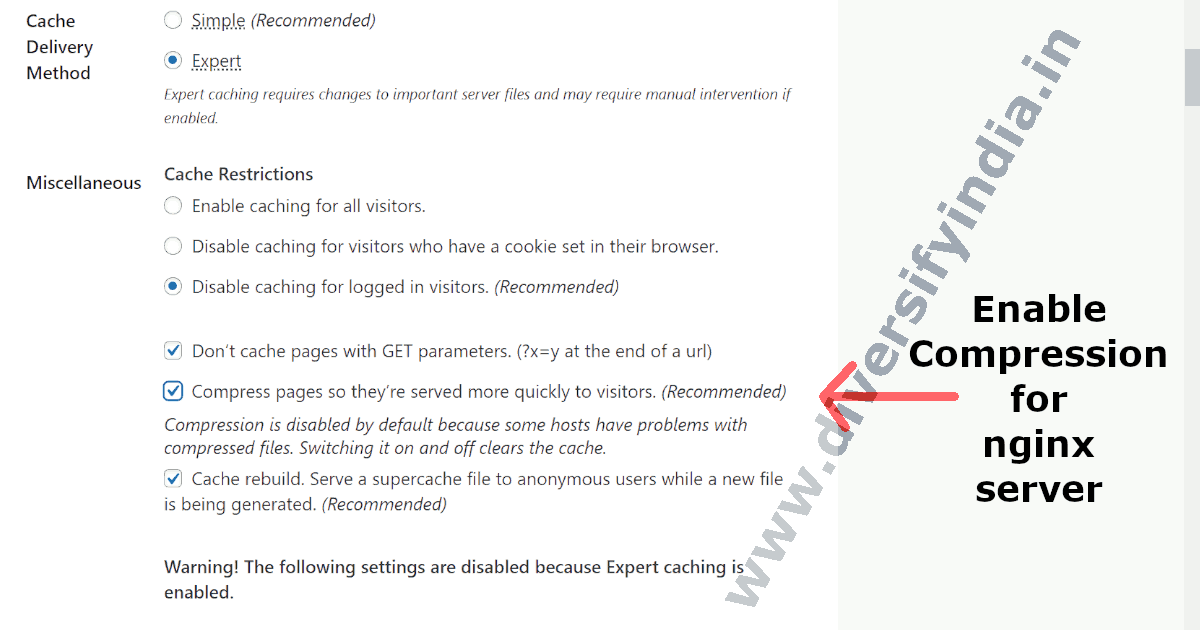
If you want to configure WP Super Cache with the Nginx server, you can read our article on how to setup WP Super Cache with NGINX.
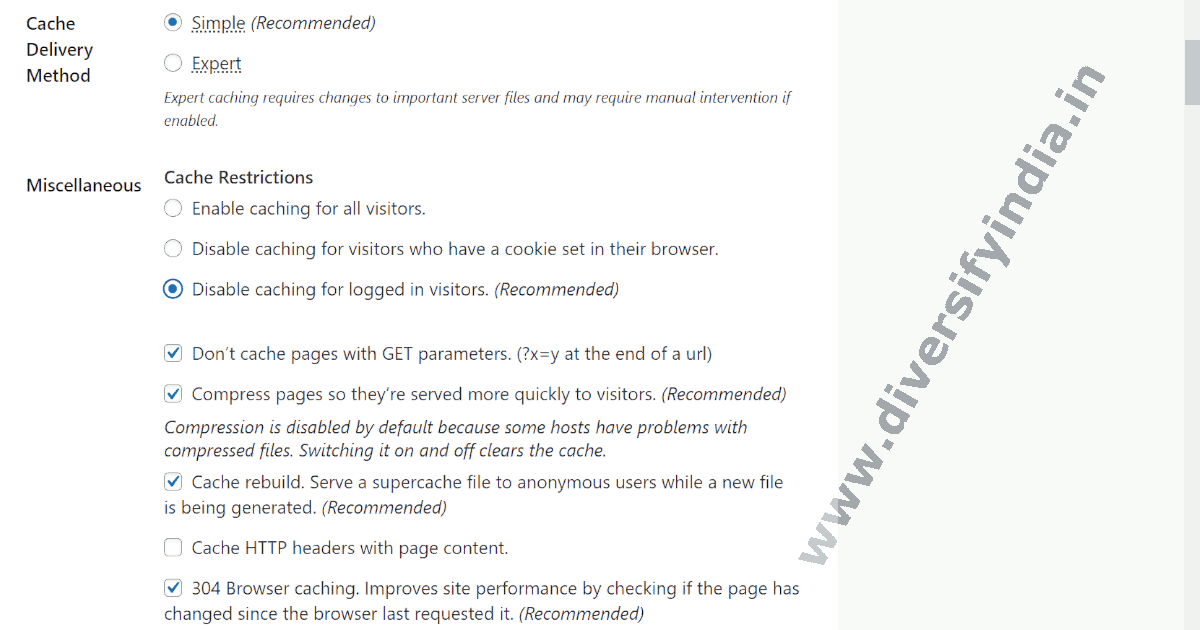
Advanced WP Super Cache Settings
- Cache Restrictions: Select the Disable caching for logged-in visitors option. It will disable caching functionality if the user is logged in.
- Don’t cache pages with GET parameters: Turn ON. This option disables the caching functionality for the search results pages. It will reduce the storage usage, so it is recommended to enable this option.
- Compress pages so they’re served more quickly to visitors: Disable this option in expert mode unless you have applied the bug fix described earlier. Otherwise, leave this enabled to serve compressed pages more efficiently.
- Cache rebuild: Turn ON. If a comment is left on a page, the cached file is deleted and recreated for the next visitor. If this option is enabled, the cached page remains until the new version is built. WP Super Cache recommends enabling this option to prevent high server load during cache regeneration.
- Cache HTTP headers with page content: Turn OFF. This option is only available in simple mode. It’s recommended to disable this option, as caching HTTP headers with page content is usually unnecessary.
- 304 Browser caching: Turn ON. This option is only available in simple mode. It checks if the page has changed since the browser’s last request, improving site performance. WP Super Cache recommends enabling this option.
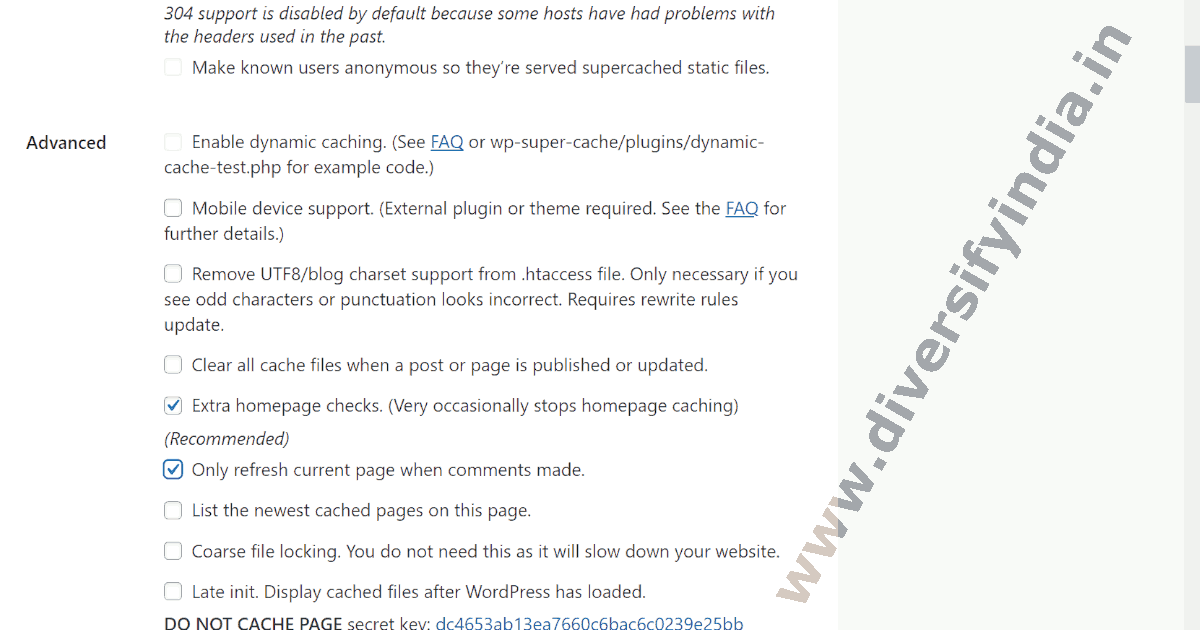
- Make known users anonymous so they’re served supercached static files: Turn OFF. Available only in simple mode. Disabling this option is recommended.
- Enable dynamic caching: Turn OFF. This is also available only in simple mode. It is recommended to disable this option for better performance.
- Mobile device support: Enable this option only if your theme is not responsive and you’re using a plugin like Jetpack’s Mobile Theme Module, WPTouch, WordPress Mobile Edition, or the WordPress Mobile Pack for responsiveness.
- Remove UTF8/blog charset support from .htaccess file: If you see odd characters or incorrect punctuation, then enable this option; otherwise, keep this option disabled.
- Clear all cache files when a post or page is published or updated: Turn OFF. This option causes high server load, especially in expert mode, and can cause the plugin to malfunction. It is recommended to disable it. For more information, check our article on how to set up the Rank Math plugin to avoid conflicts with WP Super Cache.
- Extra homepage checks: Turn ON. WP Super Cache recommends enabling this option.
- Only refresh current page when comments made: Turn ON. It is recommended to enable this option. It will update the post when there is a new comment.
- List the newest cached pages on this page: Turn OFF. It is recommended to disable this option.
- Coarse file locking: Turn OFF. It is recommended to disable this option.
- Late init: Turn OFF. This serves cache files after the init hook is fired. It is recommended to disable this option, as enabling it can significantly reduce performance.
- Cache Location: Use this option to change the default location of the cache directory.
- Mod Rewrite Rules: The default mod rewrite rules do not need any adjustments.
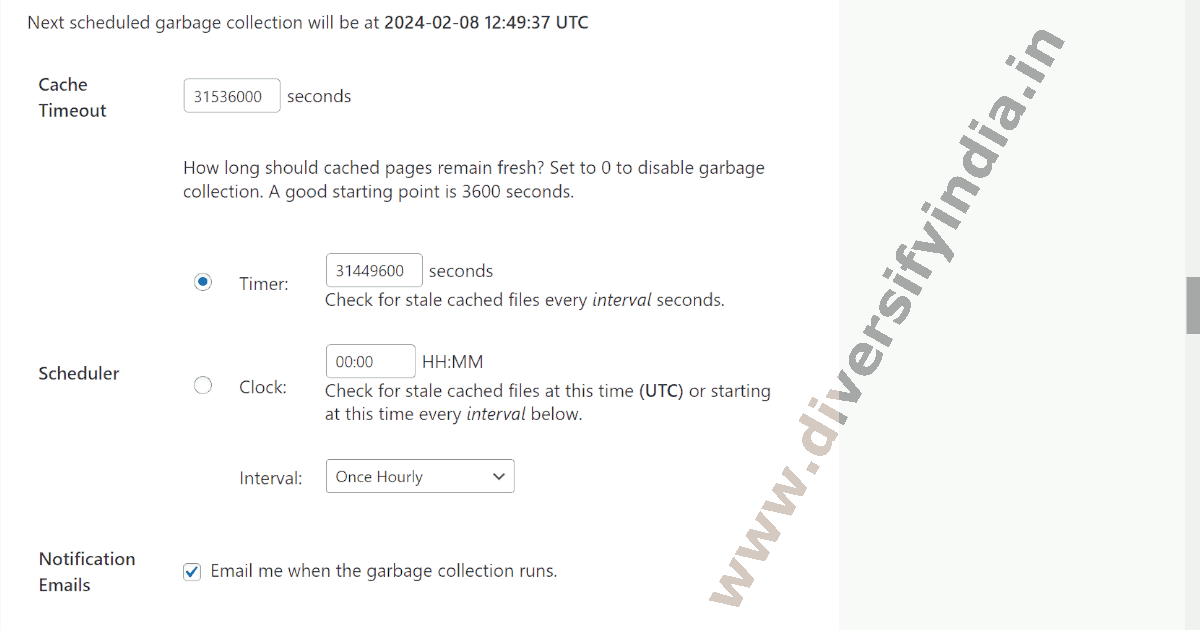
Expiry Time and Garbage Collection
- Cache Timeout: Set the cache timeout as long as possible, such as
31536000seconds, which equals one year. This ensures stale cached files are cleared only once a year. - Stale Cache Timer: Set the timer to one day before the timeout period, e.g.,
31449600seconds. This marks cache files as stale so they can be deleted when garbage collection runs.
Rejected Files and URIs
- Accepted Filenames and Rejected URIs: Select page types for which caching should be disabled. No changes are required.
- Rejected URL Strings: Add URL strings for which caching should be disabled. No other changes are required.
- Rejected Cookies: Add cookies for which caching should be disabled. No other changes are required.
- Always Cache Filenames: Add file names that should be cached even if they match any condition to disable cache functionality. No changes are required.
- Tracking Parameters: No changes are required.
- Rejected User Agents: Add any user agents for which you want to disable caching. No other changes are required.
- Lock Down: Keep it disabled.
- Directly Cached Files: No changes are required.
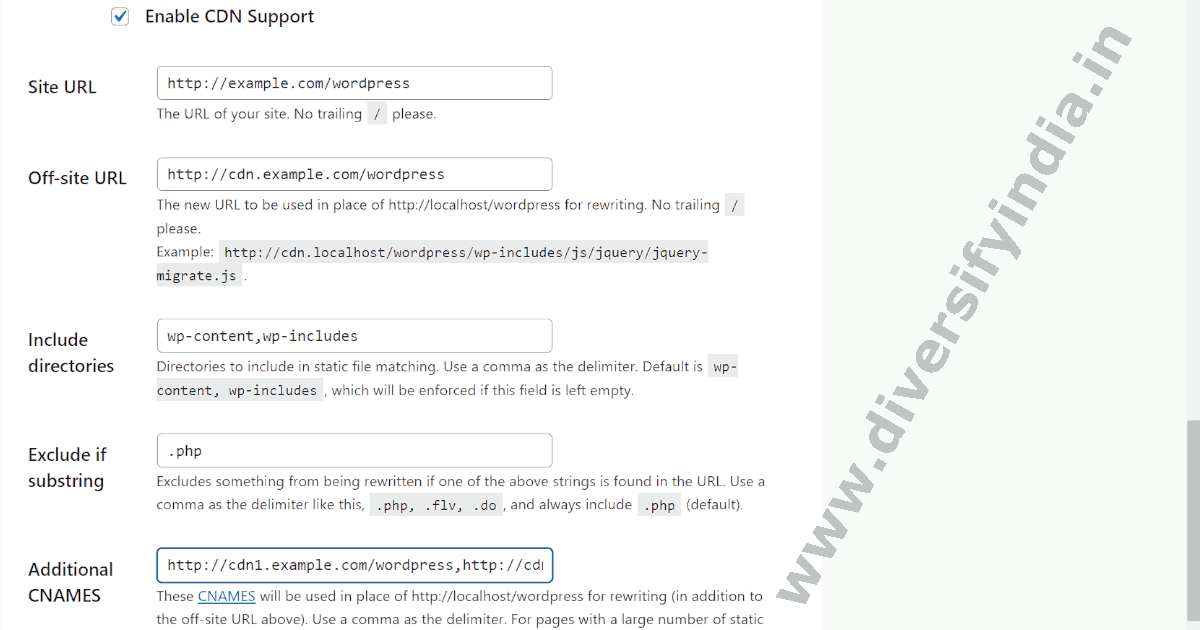
CDN Settings
If you are using Cloudflare CDN, you do not need to configure these settings. Most CDN providers require you to configure CDN settings from their control panel, so in most cases, this option should be disabled.
If you are not using Cloudflare and are using other CDN providers that require replacing all links to static files (such as images, JavaScript, CSS, fonts, etc.) with their CDN URL, you can use this option to replace all links on your webpage with the CDN provider’s URL.
- Enable CDN Support.
- Site URL: Add your site URL without the trailing slash, e.g.,
https://www.diversifyindia.in. - Off-site URL: Add your CDN provider’s URL, e.g.,
https://cdn.example.com. - Include directories: Specify directories with static files, separated by commas.
- Exclude if substring: No change is required.
- Additional CNAMES: Add additional CDN CNAMES, e.g.,
https://cdn1.example.com,https://cdn2.example.com.
Preload Cache
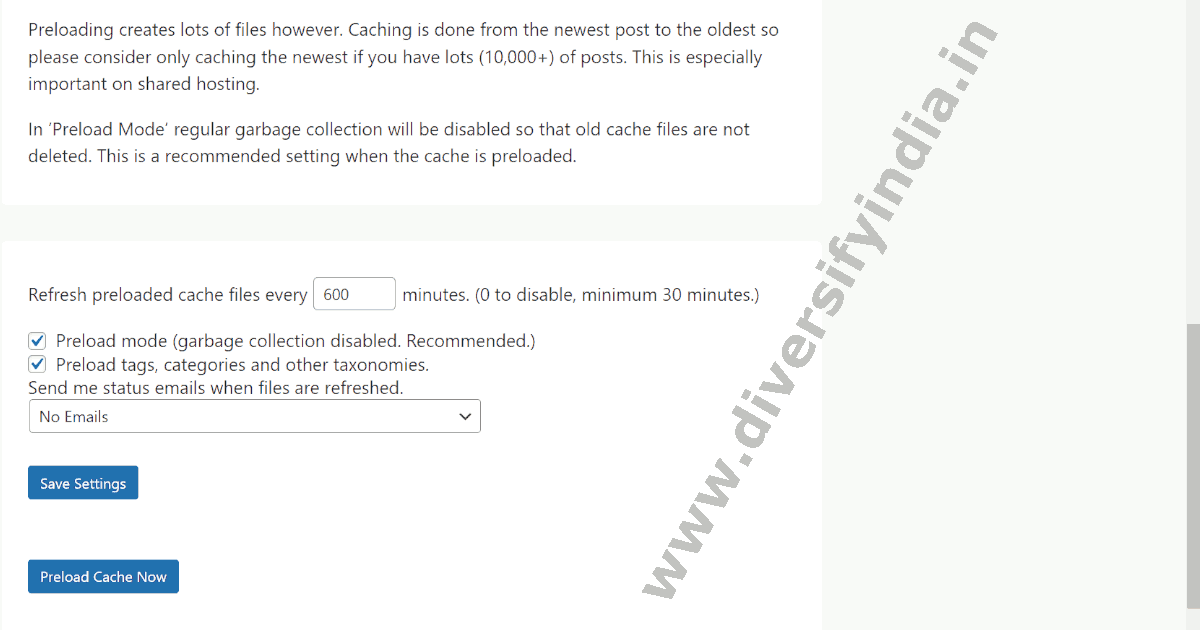
Preloading creates cache pages before users visit them, reducing load times for the first visitor.
To configure preload:
- Check both checkboxes for Preload Mode and Preload Tags/Categories.
- Save the settings.
- To preload instantly, click Cancel Preload first, then Preload Cache Now. If not, preload will start after 10 minutes.
Conclusion
Your WP Super Cache plugin is now fully configured for optimal performance. These are the recommended WP Super Cache settings to ensure faster page loading times and reduced server load. By following these advanced settings, you can maximize the efficiency of the WP Super Cache Plugin.
Frequently Asked Questions
Which is better, WP Super Cache or LiteSpeed Cache?
WP Super Cache is an excellent caching plugin for WordPress. In comparison, LSCache relies on an additional module to provide caching functionality, which can increase RAM usage. However, WP Super Cache’s expert mode offers similar functionality without requiring any extra modules, resulting in minimal RAM usage.
Additionally, WP Super Cache is compatible with various servers such as Apache, NGINX, and Lighttpd, while LSCache is designed to work exclusively with the LiteSpeed server.
What is the use of caching?
The primary purpose of caching is to enhance data retrieval performance. Without caching, the server’s resource consumption increases significantly, which can reduce the overall performance of the website.
Can we use WP Super Cache with the Nginx Server?
Yes, you can configure the Nginx server to work with the WP Super Cache plugin. For detailed instructions, read our article on configuring WP Super Cache for the Nginx server.